- What is expansion microscopy?
- What are the steps of expansion microscopy?
- How does expansion microscopy work?
- What are the limitations of expansion microscopy?
Introduction
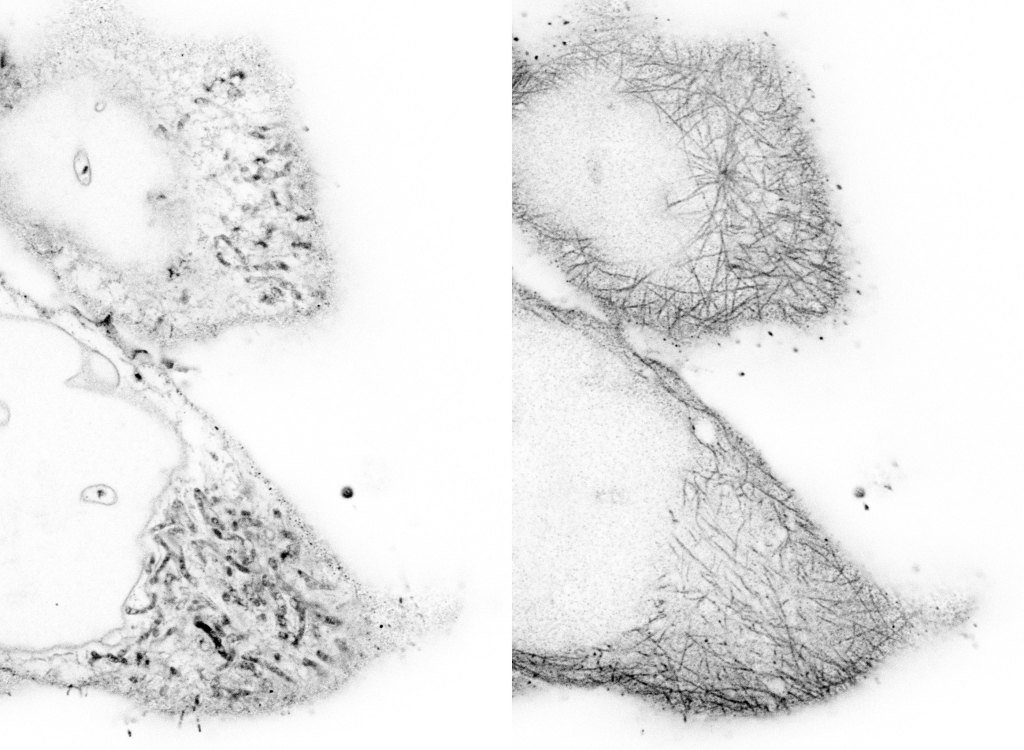
Expansion microscopy (ExM) is a revolutionary technique that utilises physical expansion of a sample rather than optical enhancement to overcome the resolution limit of light microscopy1,2,3.

Sample courtesy of Thijs Makaske, Kapitein lab, Utrecht University
At its core, ExM is a super-resolution technique which, in contrast to other methods, focuses on physical magnification rather than optical magnification. Instead of designing more complex optical setups to image under the diffraction limit, in ExM we make the effective limit lower by physically enlarging the sample in three dimensions.
That is, if your sample is expanded by an expansion factor ExF, the resolution limit simply reduces by this factor:
𝑑lateral = λ/(2 𝑛 sin𝜃 𝐸𝑥𝐹) , 𝑑axial = 2λ/([𝑛 sin𝜃]^2 𝐸𝑥𝐹)
This means that images can be acquired using any light microscope, with a resolution ExF times better than its original capabilities.
Workflow
ExM requires several optimised steps to ensure that expansion is isotropic across the whole sample, without distortions. There are many variations of ExM, with differences in chemical composition, buffer concentration, order of steps, and expansion factor5. These differences allow a huge variety of samples to be imaged using ExM, including bacteria, yeast and mammalian cells, organoids, tissue slices, plant sections, or whole organisms.
The following is a typical workflow for a standard ExM experiment, with pre-expansion labelling:
| Step | Purpose |
|---|---|
| Fixation | Preserve cellular structures and immobilise biomolecules in place. |
| Immunostaining | Label specific structures with fluorescent antibodies or probes for visualisation. |
| Anchoring | Prepare labelled molecules or proteins to be linked to a polymer matrix. |
| Gelation | Form a dense hydrogel network throughout the sample to stabilise structures. |
| Digestion | Partially digest cellular components to soften structure and allow uniform expansion. |
| Expansion | Physically enlarge the sample by swelling the hydrogel in water, improving resolution. |
| Imaging | Visualise the expanded sample under any light microscope with higher effective resolution. |
One important variation on the standard workflow is post-expansion labelling2,6,7. Here, immunostaining is performed after the sample is incorporated into the gel and homogenised. This has several advantages, namely, (i) the sample has been ‘cleared’ by ExM, allowing better access to epitopes, (ii) molecules are spaced further apart, reducing steric hindrance, (iii) the distance between primary and secondary antibodies is not expanded, reducing linkage error, and (iv) it opens up the possibilities for multiplexed labelling strategies. Post-expansion labelling typically results in a brighter image with better effective resolution, making it a good option for many samples. However, to preserve epitopes during the homogenisation step, an alternative strategy is used. Instead of enzymatic digestion cleaving the protein, proteins are denatured to reduce their higher-order structure and allow isotropic expansion, but also preserve the primary structure to allow epitopes to be recognised by antibodies. This is typically achieved through chemical treatments or heat, to unfold the proteins without breaking peptide bonds.
The following is a typical workflow for a standard ExM experiment, with post-expansion labelling:
| Step | Purpose |
|---|---|
| Fixation | Preserve cellular structures and immobilise biomolecules in place. |
| Anchoring | Prepare labelled molecules or proteins to be linked to a polymer matrix. |
| Gelation | Form a dense hydrogel network throughout the sample to stabilise structures. |
| Denaturation | Denature cellular components for isotropic expansion and epitope preservation. |
| Immunostaining | Label specific structures with fluorescent antibodies or probes, in a modestly expanded hydrogel. |
| Expansion | Physically enlarge the sample by swelling the hydrogel in water, improving resolution. |
| Imaging | Visualise the expanded sample under any light microscope with higher effective resolution. |
Gel chemistry
Each step in the ExM workflow involves specific chemical reactions that facilitate the process of sample expansion. The following is a non-exhaustive list of commonly used components, and a breakdown of their chemistry:
Anchoring
Acryloyl-X SE (AcX): Bivalent chemical linker The NHS (N-hydroxysuccinimide) ester group on AcX reacts with the primary amine groups on proteins, forming stable amide bonds. AcX also contains alkene bonds and an acrylamide group, used in the gelation step to cross-link the proteins to the hydrogel. Formaldehyde (FA): Cross-linker Acrylamide (AA): Polymerisable anchoring monomer An alternative solution to anchoring with AcX is FA/AA. FA cross-links proteins by forming covalent bonds between amine groups, preserving cellular structure. AA reacts with these cross-linked proteins and is incorporated into the hydrogel matrix during polymerisation. This method can enable direct incorporation of proteins into the polymer network without the need for additional chemical linkers, simplifying the protocol and improving retention of biomolecules in some cases.
Gelation
Acrylamide (AA): Polymerisable monomer Sodium Acrylate (SA): Charged co-monomer Methylenebisacrylamide (MBAA): Structuring cross-linker Ammonium Persulfate (APS): Free radical donor Tetramethylethylenediamine (TEMED): Free radical accelerator AA, SA and MBAA are monomers that are used to form the polyacrylamide hydrogel. They, like AcX, contain alkene bonds and acrylamide groups. These groups can be attacked by free radicals, causing them to link together. As AA, SA and AcX contain only one acrylamide group, they will form linear chains. As MBAA contains two, it can cross-link these chains, forming the network that embeds the sample. APS acts as the radical initiator, and TEMED accelerates the decomposition of APS into free radicals, initiating the polymerization process. SA is negatively charged and hghly hydrophilic, used in the expansion step to draw in water and drive swelling of the hydrogel.
Homogenisation
Proteinase K: Enzyme for digestion Tritin X-100: Non-ionic detergent Ethylenediaminetetraacetic acid (EDTA): Ion chelation agent Sodium chloride (NaCl): Ionic salt Tris(hydroxymethyl)aminomethane (Tris): Buffering agent Digestion buffer has various components to break down/remove structure. Proteinase K is a broad-spectrum serine protease that digests proteins into smaller fragments. Triton X-100 is a non-ionic detergent that permeabilises cell membranes and solubilises proteins. EDTA is a chelating agent that binds divalent metal ions such as calcium and magnesium, cofactors for many nucleases and proteases. By sequestering these ions, EDTA helps protect the sample from unwanted extra degradation. NaCl provides ionic strength and maintains osmotic balance, stabilising the sample. Tris is a buffering agent that maintains a stable pH environment, ensuring optimal activity of Proteinase K. Sodium dodecyl sulfate (SDS): Ionic detergent Urea: Chaotropic agent Triton X-100: Non-ionic detergent EDTA: Ion chelation agent Tris: Buffering agent Denaturation buffer is used instead of enzymatic digestion in post-expansion labelling protocols. SDS is a strong ionic detergent that disrupts lipid membranes and denatures proteins by disrupting non-covalent bonds. Urea is a chaotropic agent that further unfolds proteins by breaking hydrogen bonds, aiding in the exposure of epitopes. Triton X-100 helps solubilise membrane components without excessive damage. EDTA chelates metal ions, helping to preserve protein integrity by preventing unwanted enzymatic activity. Tris maintains pH stability, ensuring consistent denaturation conditions. Together, these components homogenise the sample while preserving antigenicity for antibody labelling after expansion.
Expansion
Water (ddH2O) The gel monomer SA is highly hydrophilic, attracting and binding water molecules. It dissociates into sodium ions (Na⁺) and acrylate anions (CH₂=CHCOO⁻) in aqueous solutions. Acrylate anions create an osmotic pressure due to their negative charges, drawing in more water to balance the ionic concentration inside and outside the hydrogel. As water molecules are absorbed, they push the polymer chains apart while maintaining cross-links, causing the entire hydrogel to expand isotropically.
Limitations
Every technique has drawbacks or incompatibilities, and expansion microscopy is no exception. In this section we consider some limitations of ExM, and how current solutions, including GelCast and GelMap, address some of these:
Sample handling and time taken
ExM requires multiple labour-intensive steps, requiring a user to repeatedly handle the sample when transferring between buffers and temperatures for up to several days. Sample fragility increases after expansion, so careful handling is essential, especially when mounting gels for imaging.
Methods to increase throughput help to reduce sample-sample variation. Custom mounting chambers and soft gel supports help preserve expanded samples during imaging. The GelCast sample processing robot automates all the steps without manual interaction, reducing the amount of sample handling and time taken.
Deformations and calibration
Although ExM aims for isotropic expansion, local distortions can occur due to inconsistencies in gel polymerisation, sample heterogeneity or sample handling. Often, these distortions go unnoticed, and are only characterised during recipe development, ignoring sample-sample variation. Unknown local expansion factors, different from the macroscopic expansion factor of the overall gel can lead to misinterpretation of spatial measurements or structural relationships at the nanoscale.
Markers of well-characterised structures such as nuclear pores or microtubules can be used to determine local expansion factors. Comparison of pre- and post-expansion images can be used to quantify and correct deformations. Computational tools also assist in image registration and 3D correction to improve measurement accuracy. Automating gel formation with GelCast improves consistency, resulting in reliable gels. Introducing a fluorescent grid into the hydrogel with GelMap8 allows deformation correction and intrinsic calibration for trustworthy quantification.
Sample compatibility
Not all biological samples are equally compatible with the same ExM protocols. Dense or highly crosslinked samples can also resist uniform expansion or enzymatic digestion, resulting in inhomogeneity. Therefore, the ExM protocol is often customised for different sample preparations.
Careful selection of ExM recipes tailored for specific samples help to reduce time wasted optimising protocols. By allowing multiple samples to be processed simultaneously, GelCast will help to make screening easier for recipe validation.
Labelling and signal issues
Fluorescent labels may degrade or become diluted during expansion, meaning that pre-expansion labelling results in a lower signal intensity. Post-expansion labelling improves accessibility, but can suffer from reduced epitope availability, affecting signal specificity and strength.
Alternative labelling strategies like trifunctional anchors or DNA barcoding could help to preserve label integrity through the expansion process. GelCast will help to make screening recipes easier by increasing throughput.
Data generation and processing
Expanded samples produce much larger image datasets due to their increased physical size and resolution. This demands improvements in data storage, computational processing, and image stitching algorithms. Handling such large files can be a bottleneck, particularly when imaging entire tissues or large volumes.
Smarter imaging, direct processing, and scalable cloud-based storage solutions can help to mitigate data overload. Advanced stitching and rendering software help manage and visualise these large datasets.
- Chen, Tillberg & Boyden (2015) Expansion microscopy. Science 347:543-548. DOI:10.1126/science.1260088
- Tillberg, Chen et al. (2016) Protein-retention expansion microscopy of cells and tissues labeled using standard fluorescent proteins and antibodies. Nature Biotechnology 34:987–992. DOI:10.1038/nbt.3625
- Wassie, Zhao & Boyden (2018) Expansion microscopy: principles and uses in biological research. Nature Methods 16:33–41. DOI:10.1038/s41592-018-0219-4
- Damstra et al. (2022) Visualizing cellular and tissue ultrastructure using Ten-fold Robust Expansion Microscopy (TREx). eLife 11:e73775. DOI:10.7554/eLife.73775
- Truckenbrodt (2023) Expansion Microscopy: Super-Resolution Imaging with Hydrogels. Analytical Chemistry 95(1):3-32. DOI:10.1021/acs.analchem.2c04921
- Ku, Swaney, Park et al. Multiplexed and scalable super-resolution imaging of three-dimensional protein localization in size-adjustable tissues. Nature Biotechnology 34:973-981. DOI:10.1038/nbt.3641
- Gambarotto & Zwettler et al. (2018) Imaging cellular ultrastructures using expansion microscopy (U-ExM). Nature Methods 16:71-74. DOI:10.1038/s41592-018-0238-1
- Damstra, Passmore et al. (2023) GelMap: intrinsic calibration and deformation mapping for expansion microscopy. Nature Methods 20:1573-1580. DOI:10.1038/s41592-023-02001-y
